Showing posts with label Salt. Show all posts

Friday, October 9, 2015

Amazing Balsamic Pot Roast


Falling leaves, dropping temps, and rich foods. Can you feel it? Fall is here, my friends! 

I looove fall! And to celebrate sweaters, boots, blankets, and all things 'fall', I kicked off October with the quintessential Fall Meal: Pot Roast, Squash Soup, and Mashed Potoates.

Now I'm here to share the recipe with you. *You're welcome.*

The secret to making a delicious pot roast is selecting the right meat. I usually defer to my husband's expertise here, but there is one thing I want you to know when making the perfect pot roast. That is; choose the right cut! My favorite is Chuck Roast. It's got the key element of a good pot roast: lots of marbling. Marbling is good for a pot roast because, when cooked for long enough and low enough, all of that fat and connective tissue melts and makes the meat tender and melt-in-your-mouth delicious.

Now that you understand why your meat selection is so important, let's get started!

As always, gather your ingredients first. You'll need Chuck Roast, Onions, Carrots, Balsamic Vinegar, Worcestershire Sauce, Crushed Red Pepper, Honey, Beef Broth, Soy Sauce, and (not shown) Olive Oil, Salt & Pepper.


Before you get started, get your meat ready. You want to really slather it with salt and pepper. I prefer Kosher Salt and fresh cracked Pepper, because they seem to stick better, but really, any you choose is fine. No matter what you use, really get in there with it. It'll seem like too much. That's good. Really coat all sides with it! Then set it aside for later.


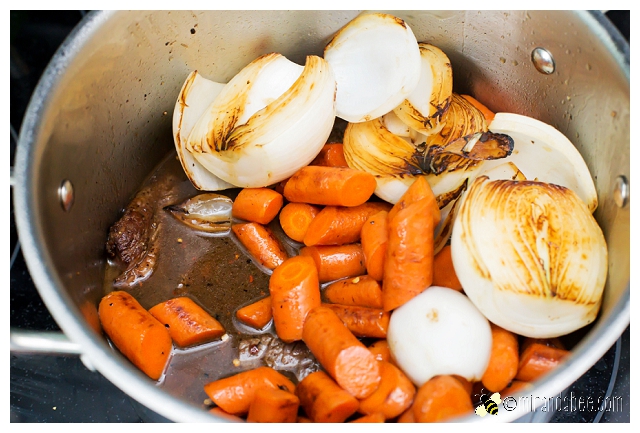
Now that the meat is ready, the first step is to heat your olive oil in a large dutch oven or a pot that is oven safe on medium high heat. While the oil is heating, peel your onions and cut them in half. Also, cut your carrots into about one inch pieces. You can peel them, but it's not necessary. (I didn't. Because I'm lazy.) Once the oil is very very hot (but not smoking), add in the onions. Brown them really well on both sides. They may come apart a little. That's ok. 

Once that's done, remove them and set them aside for now. Add the carrots to the pot and do the same thing with them. Toss them in the pot until they have a nice, browned color. Remember. The point isn't to cook them. It's just to get a nice color started on the outside.
 
Remove the carrots and set them aside with the onions. Both should look good enough to eat (but don't! You'll need them later).


Now, remember that meat you set aside earlier? Get it ready. It's time for it to shine! Add a little more Olive Oil (or butter, if you want something extra rich) to your pot and let it heat up again. The bottom of the pan should be nice and charred from the carrots and onions. That's good stuff! Once the oil (or butter) is heated, add the chuck roast to the pot.


Sear it on all sides so that it gets a reeeallly nice brown color (about 1-2 minutes each side). Make sure to get all sides. The browner, the better. Once it's seared well, set it aside for now.


In the pan, you should see lots of charred, brown bits in the bottom of the pan. Keep it! That's all of the flavor! So, now we'll do what's called deglazing. That just means adding Beef Broth (about a cup) to your pan and scraping the bottom of the pot. That will loosen all of the char and add the excellent flavor to your roast. In a separate bowl, mix together the Balsamic Vinegar, Worcestershire Sauce, Soy Sauce, Honey, and Red Pepper Flakes. Set it aside.


Once the pot is deglazed, add your chuck roast back to the pan. Try to make it so that the meat is all on one layer at the bottom of the pot (if it's large enough). Then add the sauce mixture over the top and (if needed) add enough extra beef broth so that it covers the meat about halfway. (I didn't have to add any more broth, but you may have to.

Next, you want to add the onion and carrots to the top of the meat. Preheat your oven to 275°
Cover the roast with a lid and place in the oven. You'll need to cook it 4-5 hours to make sure it's nice and tender. (I cooked ours for 4 hours and the fat wasn't quite all the way rendered. So next time I'd make it closer to 5 hours.)

Now just let 'er cook! Don't peek, be patient, and at the end of the timer, you'll be rewarded! Once it's done, shred the meat with two forks. That should be easy, since the meat will just fall apart. Here's what you should end up with:
  
As I said, we served ours with mashed potatoes and squash soup. Enjoy!


Wednesday, March 5, 2014

Oven Roasted Asparagus

This is a super simply, tasty recipe that makes it easy to include veggies in your dinner. Even when you're short on time.

What you'll need (left to right): Asparagus, dried onion, crushed red pepper, oregano, salt, garlic powder, and olive oil.


There are only a few steps to go over, so it won't take long. First, cut off the ends of the asparagus (on the stalk side) and place them in a large bowl or pan. Sprinkle them with the oil and seasonings.

Mix them well to make sure each piece is coated evenly, then place them on a cookie sheet. This is the most important step! Make sure there is space between EACH ONE!! This makes sure that they develop the irresistible crunch rather than just steaming and getting soggy. If you have to use more than one pan, so be it. I usually do.

Bake on 425 for about 15-20 minutes and that's it! I served ours with Italian Chicken Parmesan.


print recipe

Oven Roasted Asparagus
Quick, easy, and tasty. A great way to add vegetables to your meal!
Ingredients
  • 1 bunch Aparagus
  • 1 Tbsp Dried Onion
  • 1 Tbsp Oregano
  • 1 Tbsp Garlic Powder
  • 1 tsp Crushed Red Pepper
  • 1 tsp Salt
  • Olive Oil
Instructions
1. Cut the tips of the asparagus (stalk end) and preheat your oven to 425°F2. Place asparagus in a large bowl. Sprinkle with seasonings and drizzle with Olive Oil.3. Mix until each piece is coated evenly and place on a cookie sheet. This is the most important step! MAKE SURE there is space between each one. This makes sure that they develop the irresistible crunch rather than just steaming and getting soggy. (If you have to use more than one pan, so be it. I usually do.) 4. Bake for 15 to 20 minutes until they are crisp.
Details
Prep time: Cook time: Total time: Yield: 4-6 servings

Tuesday, March 4, 2014

Italian Chicken Parmesan

I've already posted this recipe once before, but I think it's time for an update. This chicken always turns out moist and flavorful. That's because instead of using egg or milk to coat the chicken before breading, you use an Italian Dressing marinade. It really makes all the difference!


What you'll need (from left to right): Pasta sauce, Italian dressing (my two favorites are the Lawry's Garlic & Herb or Wishbone Italian Dressing), olive oil, garlic powder, chicken, Parmesan cheese, bread crumbs, Italian seasoning, pasta, black pepper, and salt.

First you need to take your boneless skinless chicken breast and put them in a Ziplock bag. You could also use a dish, if you want. Just whatever you want to use to marinate it in the fridge overnight.

To the bag, add Parmesan cheese and Italian dressing. Seal the bag and mix it all around until the marinade coats each piece of chicken.

Let it marinate in the fridge for at least 30 minutes and up to overnight. Obviously, the longer it marinates, the stronger the flavor will be.

When you are ready to bread the chicken, add the bread crumbs and seasonings (garlic powder, Italian seasoning, salt, and pepper) to a large bowl.

Mix it all together really well.

Place each piece of chicken in the bowl and coat evenly.

Once they are all coated, place the chicken on a cookie sheet and bake for 30 minutes.


While the chicken is baking, cook your pasta and sauce. When everything is done, serve chicken on a bed of pasta. I also served ours with a side of Oven Roasted Asparagus.


print recipe

Italian Chicken Parmesan
A simple, flavorful, Italian-inspired dish perfect for a weeknight meal.
Ingredients
  • 2 lbs Boneless Skinless Chicken Breast
  • 1/4 cup Grated Parmesan Cheese
  • 1/3 cup Italian Dressing
  • 1 1/2 cups Bread Crumbs (or Crushed Croutons)
  • 1 tsp Garlic Powder
  • 1 tsp Italian Seasoning
  • 1/2 tsp Salt
  • 1/2 tsp Black Pepper
  • Olive Oil
  • 1 lb Pasta
  • 2 cups Marinera Sauce
  • Parmesan Cheese for Garnish
Instructions
1. Place chicken in a Ziplock Bag. Mix Parmesan Cheese and Italian Dressing and add it to chicken. Marinate in fridge for at least 30 minutes (or up to overnight).2. Preheat oven to 350°F3. Mix seasonings and bread crumbs in a shallow dish.4. Coat chicken with bread crumbs and place on lightly oiled cookie sheet.5. Bake for 30 minutes.6. While the chicken is baking, cook pasta as the package directs and warm the marinara sauce of your choice.7. When the chicken, pasta, and sauce are done; top with Parmesan Cheese, serve and enjoy.
Details
Prep time: Cook time: Total time: Yield: 4-6 servings