Falling leaves, dropping temps, and rich foods. Can you feel it? Fall is here, my friends!
I looove fall! And to celebrate sweaters, boots, blankets, and all things 'fall', I kicked off October with the quintessential Fall Meal: Pot Roast, Squash Soup, and Mashed Potoates.
Now I'm here to share the recipe with you. *You're welcome.*
The secret to making a delicious pot roast is selecting the right meat. I usually defer to my husband's expertise here, but there is one thing I want you to know when making the perfect pot roast. That is; choose the right cut! My favorite is Chuck Roast. It's got the key element of a good pot roast: lots of marbling. Marbling is good for a pot roast because, when cooked for long enough and low enough, all of that fat and connective tissue melts and makes the meat tender and melt-in-your-mouth delicious.
Now that you understand why your meat selection is so important, let's get started!
As always, gather your ingredients first. You'll need Chuck Roast, Onions, Carrots, Balsamic Vinegar, Worcestershire Sauce, Crushed Red Pepper, Honey, Beef Broth, Soy Sauce, and (not shown) Olive Oil, Salt & Pepper.
Before you get started, get your
meat ready. You want to really slather it with salt and pepper. I prefer
Kosher Salt and fresh cracked Pepper, because they seem to stick
better, but really, any you choose is fine. No matter what you use,
really get in there with it. It'll seem like too much. That's good.
Really coat all sides with it! Then set it aside for later.
Now that the meat is ready, the first step is to heat your olive oil in a
large dutch oven or a pot that is oven safe on medium high heat. While
the oil is heating, peel your onions and cut them in half. Also, cut
your carrots into about one inch pieces. You can peel them, but it's not necessary. (I didn't. Because I'm lazy.)
Once the oil is very very hot (but not smoking), add in the onions.
Brown them really well on both sides. They may come apart a little.
That's ok.
Once that's done, remove them and set them aside for now. Add the
carrots to the pot and do the same thing with them. Toss them in the pot
until they have a nice, browned color. Remember. The point isn't to
cook them. It's just to get a nice color started on the outside.
Remove the carrots and set them aside with the onions. Both should look
good enough to eat (but don't! You'll need them later).
Now, remember that meat you set aside earlier? Get it ready. It's time
for it to shine! Add a little more Olive Oil (or butter, if you want
something extra rich) to your pot and let it heat up again. The bottom of the pan
should be nice and charred from the carrots and onions. That's good
stuff!
Once the oil (or butter) is heated, add the chuck roast to the pot.
Sear it on all sides so that it gets a reeeallly nice brown color (about
1-2 minutes each side). Make sure to get all sides. The browner, the
better. Once it's seared well, set it aside for now.
In the pan, you should see lots of charred, brown bits in the bottom of
the pan. Keep it! That's all of the flavor! So, now we'll do what's
called deglazing. That just means adding Beef Broth (about a cup) to
your pan and scraping the bottom of the pot. That will loosen all of the
char and add the excellent flavor to your roast.
In a separate bowl, mix together the Balsamic Vinegar, Worcestershire
Sauce, Soy Sauce, Honey, and Red Pepper Flakes. Set it aside.
Once the pot is deglazed, add your chuck roast back to the pan. Try to
make it so that the meat is all on one layer at the bottom of the pot
(if it's large enough). Then add the sauce mixture over the top and (if
needed) add enough extra beef broth so that it covers the meat about
halfway. (I didn't have to add any more broth, but you may have to.
Next, you want to add the onion and carrots to the top of the meat.
Preheat your oven to 275°
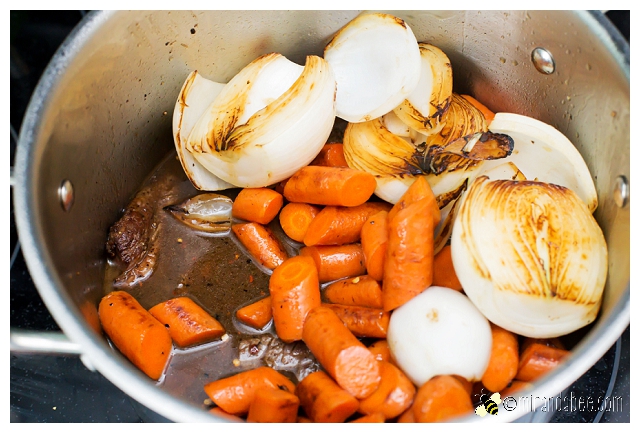
Cover the roast with a lid and place in the oven. You'll need to cook it
4-5 hours to make sure it's nice and tender. (I cooked ours for 4 hours
and the fat wasn't quite all the way rendered. So next time I'd make it
closer to 5 hours.)
Now just let 'er cook! Don't peek, be patient, and at the end of the
timer, you'll be rewarded! Once it's done, shred the meat with two
forks. That should be easy, since the meat will just fall apart. Here's
what you should end up with:
As I said, we served ours with mashed potatoes and squash soup.
Enjoy!
Showing posts with label Crushed Red Pepper. Show all posts
Friday, October 9, 2015
Amazing Balsamic Pot Roast
Tuesday, March 18, 2014
Oven Roasted Eggplant
Roasted Eggplant is very versatile. It could be served as a side, with pasta, as a main dish... you name it. We eat ours in pita wraps with chicken, lettuce, hummus, and Tzatziki Sauce. It's an easy, flavorful dish.
To make it, you'll need: Eggplant, Crushed Red Pepper, Dried Parsley, Garlic, Salt, and Pepper.
Chop up your eggplant and put it in a bowl.
Drizzle with olive oil and add spices to it. Put it in a pan and put it in the oven at 425° for 20-25 minutes.
That's it. Serve however you'd like! :)
To make it, you'll need: Eggplant, Crushed Red Pepper, Dried Parsley, Garlic, Salt, and Pepper.
Chop up your eggplant and put it in a bowl.
Drizzle with olive oil and add spices to it. Put it in a pan and put it in the oven at 425° for 20-25 minutes.
That's it. Serve however you'd like! :)
print recipe


Oven Roasted Eggplant
by Miranda at mirandabee.com March-18-2014
Flavorful and versatile, this dish can be served as a side, with pasta, as a main dish, inside a pita - you name it.
Ingredients
- 1-2 Large Eggplant
- 1 Tbsp Dried Parsley
- 2-3 cloves Garlic
- 1 tsp Crushed Red Pepper
- 1/2 tsp Salt
- 1/2 tsp Pepper
- Olive Oil
Instructions
1. Preheat the oven to 425°F. Dice the eggplant into chunks.2. Place the eggplant in a large bowl and toss with olive oil and spices.3. Bake for 20-25 minutes until golden brown.
Details
Prep time: Cook time: Total time: Yield: Wednesday, March 5, 2014
Oven Roasted Asparagus
This is a super simply, tasty recipe that makes it easy to include veggies in your dinner. Even when you're short on time.
What you'll need (left to right): Asparagus, dried onion, crushed red pepper, oregano, salt, garlic powder, and olive oil.
There are only a few steps to go over, so it won't take long. First, cut off the ends of the asparagus (on the stalk side) and place them in a large bowl or pan. Sprinkle them with the oil and seasonings.
Mix them well to make sure each piece is coated evenly, then place them on a cookie sheet. This is the most important step! Make sure there is space between EACH ONE!! This makes sure that they develop the irresistible crunch rather than just steaming and getting soggy. If you have to use more than one pan, so be it. I usually do.
Bake on 425 for about 15-20 minutes and that's it! I served ours with Italian Chicken Parmesan.
What you'll need (left to right): Asparagus, dried onion, crushed red pepper, oregano, salt, garlic powder, and olive oil.
There are only a few steps to go over, so it won't take long. First, cut off the ends of the asparagus (on the stalk side) and place them in a large bowl or pan. Sprinkle them with the oil and seasonings.
Mix them well to make sure each piece is coated evenly, then place them on a cookie sheet. This is the most important step! Make sure there is space between EACH ONE!! This makes sure that they develop the irresistible crunch rather than just steaming and getting soggy. If you have to use more than one pan, so be it. I usually do.
Bake on 425 for about 15-20 minutes and that's it! I served ours with Italian Chicken Parmesan.
print recipe

Oven Roasted Asparagus
by Miranda at mirandabee.com March-6-2014
Quick, easy, and tasty. A great way to add vegetables to your meal!
Ingredients
- 1 bunch Aparagus
- 1 Tbsp Dried Onion
- 1 Tbsp Oregano
- 1 Tbsp Garlic Powder
- 1 tsp Crushed Red Pepper
- 1 tsp Salt
- Olive Oil
Instructions
1. Cut the tips of the asparagus (stalk end) and preheat your oven to 425°F2. Place asparagus in a large bowl. Sprinkle with seasonings and drizzle with Olive Oil.3. Mix until each piece is coated evenly and place on a cookie sheet. This is the most important step! MAKE SURE there is space between each one. This makes sure that they develop the irresistible crunch rather than just steaming and getting soggy. (If you have to use more than one pan, so be it. I usually do.) 4. Bake for 15 to 20 minutes until they are crisp.
Details
Prep time: Cook time: Total time: Yield: 4-6 servings
Labels:
Asparagus,
Crushed Red Pepper,
Dried Onion,
Garlic,
Garlic Powder,
Oil,
Olive Oil,
Onion,
Recipes,
Salt,
Sides
Sunday, October 14, 2012
Broiled Salmon with Thai Sweet Chili Glaze
Every pregnancy I have one or two foods that I just can't stand. The sight, smell, or even thought of them make me sick. And that is throughout the whole pregnancy. Last pregnancy it was Gyros (though, I blame that on E for making me be trapped in the car with him while he ate on from The Mad Greek Cafe on our trip from California to Colorado). But I digress. The point is, that this pregnancy it's shell fish. And I normally love crab legs and enjoy shrimp and lobster occasionally too. So, imagine my disappointment to discover that with this pregnancy, I can't even be around it.
Luckily, this doesn't apply equally to all seafood. For example, I have been craving salmon lately.
Cut your salmon into filets. The size depends on your preference. You can also, of course, buy salmon that's already cut.
Set some of the marinade aside and put the rest in a pan (or bowl or bag) with the salmon and marinate for about an hour.
Luckily, this doesn't apply equally to all seafood. For example, I have been craving salmon lately.
So, when I found a recipe that combined that craving with my love of Thai Sweet Chili Sauce that has been floating around Pinterest, I was excited to try it. I changed a few things to make it our own and now it has become one of the favorite and most requested meals in our house. Here it is: Broiled Salmon with Thai Sweet Chili Glaze. It's a very simple recipe. It only takes a few steps.
*(NOTE: In my personal case I doubled this recipe.)
Then, mix the Thai Sweet Chili Sauce, soy sauce, and teriyaki sauce in a bowl.
My favorite Teriyaki Sauce is Mr. Yoshida's Original Flavor, but use whatever you like best.
Set some of the marinade aside and put the rest in a pan (or bowl or bag) with the salmon and marinate for about an hour.
While the salmon is marinating, add the peanut butter to the sauce you set aside. Mix it well. If you're allergic or simply don't like peanut butter, you can skip this step. I like the hint of peanut butter flavor when I add the sauce to the cooked salmon, but it's not necessary.
When your salmon is done marinating, place it onto a baking sheet. Discard the marinade. Then broil the salmon for 10-15 minutes, or until it's done.
I garnished mine with toasted sesame seeds, chopped green onion, and some of my extra sauce from earlier. I served it over brown rice with Asian style roasted veggies.
print recipe

So, have you tried it yet? How was it? What would you do differently? If you haven't tried it; will you?
Broiled Salmon eith Thai Sweet Chili Glaze By Miranda at mirandabee.com, February 7, 2015
Simple, delicious recipe. Perfect for pairing with brown rice and roasted vegetables. Can also be modified for chicken. Prep Time: 15 Minutes Cook Time: 15 Minutes Yield: 4 servings
Ingredients
- 4 Salmon Filets (6oz each)
- 6 Tbsp Thai Sweet Chili Sauce
- 3 Tbsp Soy Sauce
- 1 Tbsp Teriyaki Sauce
- 1 Tbsp Peanut Butter (optional)
- Green Onions for Garnish (optional)
- Toasted Sesame Seeds for Garnish (optional)
Recipe Instructions
- Cut your salmon into filets, if not already done.
- Mix the Thai Sweet Chili Sauce, soy sauce, and teriyaki sauce in a bowl. Set some of the marinade aside and marinate salmon in the rest for at least an hour.
- OPTIONAL: While the salmon is marinating, add the peanut butter to the sauce you set aside. Mix it well.
- When your salmon is done marinating, place it onto a baking sheet. Discard the marinade. Then broil the salmon for 10-15 minutes, or until it's done.
- Garnish with toasted sesame seeds or green onion, if desired. Serve.
Subscribe to:
Posts (Atom)


